Excel Options is a feature that you can use to customize a lot of settings related to Excel display and behavior.
In this article, I will show you where to find the Excel Options feature, what settings you can set using it, and how to fix the issue of not being able to display the Excel Options window if it ever occurs to you.
A/ Where is Excel options feature?
Excel Options dialog box offers all the settings to customize Excel.
To open Excel options:
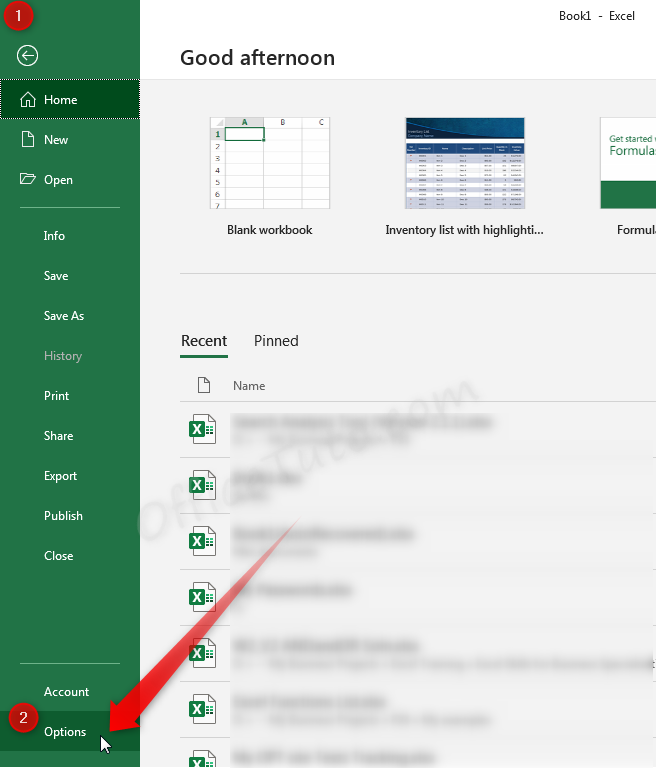
- Click on File tab (Office button in Excel 2007).
- Click on Options (Excel Options in Excel 2007).
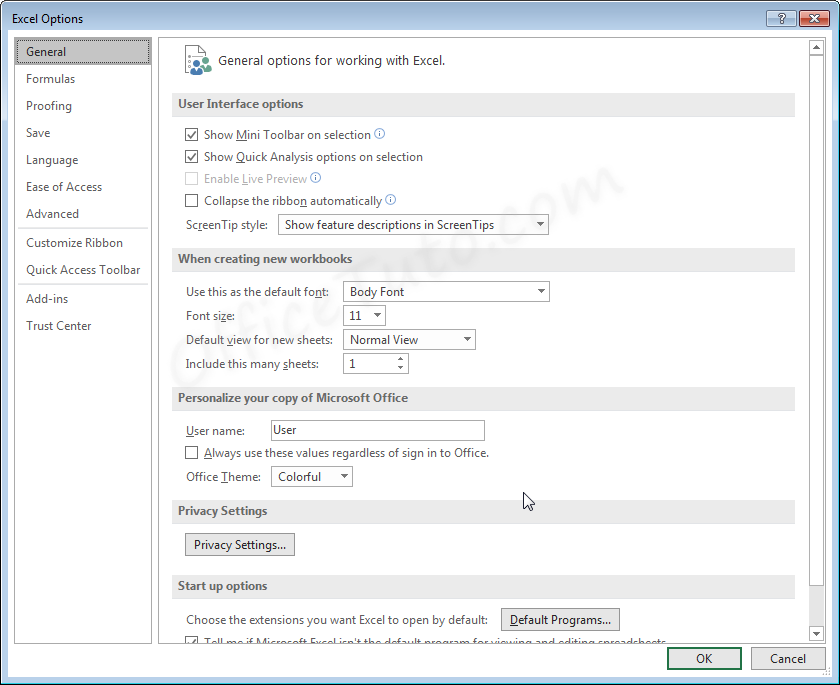
- “Excel Options” dialog box shows.
You can also use the keyboard shortcut to open Excel Options dialog box: Alt + F + T.
B/ Setting up Excel options
Excel Options dialog box contains all the settings to customize the look and behavior of Excel application and workbooks.
It is organized by categories provided in the left pane, and each category contains a lot of settings grouped by sections.
The categories of settings provided in the Excel Options dialog box are:
- General.
- Formulas.
- Data.
- Proofing.
- Save.
- Language.
- Ease of Access.
- Advanced.
- Customize Ribbon.
- Quick Access Toolbar.
- Add-ins.
- Trust Center.
In the following table, I listed for each category a little description of its purpose, as well as the different settings that you can set there.
| Category of Excel Settings | Description and Types of Settings |
|---|---|
| General | The “General” category provides general settings related to: – Show mini toolbar on selection. – Show Quick Analysis options on selections. – Enable Live Preview. – Collapse the ribbon automatically when window is small. – Default font and size for new workbooks. – Number of sheets on a new workbook. – User name included in the file properties. – Theme used. – Privacy settings. – Extensions opened by default by Excel. – Show the start screen at the launch of Excel. |
| Formulas | The “Formulas” category provides settings related to calculation mode, formulas and error handling: – Calculation mode: automatic or manual. – Reference style: letters or numbers for columns. – Error checking rules. |
| Data (Excel 2019 and newer) | The “Data” category provides data import and data analysis settings: – Default layout for pivot tables. – Disable undo for large pivot table refresh operations to reduce time. – Disable undo for large data model operations. – Enable data analysis add-ins: Power Pivot, Power View, and 3D maps. – Disable automatic grouping of date/time columns in pivot tables. – Show legacy data import wizards. |
| Proofing | The “Proofing” category provides text formatting and correction settings: – AutoCorrect and AutoFormat during typing. – Spelling correction rules. – Spelling dictionaries. |
| Save | The “Save” category provides settings for saving and recovering workbooks: – Default format for saving a workbook. – Save every x minutes. – Where to save the autorecover versions. – Default location for saving. |
| Language | The “Language” category provides settings for display and proofing languages: – Display language for tabs, menus, buttons, and dialog boxes. – Proofing language for spelling and grammar check. |
| Ease of Access / Accessibility | The “Ease of Access” or “Accessibility” category provides accessibility settings : – Provide feedback with sound and/or animation. – Show screen tips. – Show descriptions in screen tips. – Font size. |
| Advanced | The “Advanced” category provides various advanced settings related to editing, images, graphics, charts, display, calculation, web, data models, and Lotus compatibility: – Where to move selection after Enter. – Enable fill handle and drag and drop. – Automatically flash fill. – Which decimal and thousand separators to use. – Show paste options when content is pasted. – Compress or not images. – High quality printing for graphics. – Show chart element names on hover. – Show chart data point values on hover. – Number of recent workbooks to display into the File tab (or Office button for Excel 2007). – Ruler units (inches, centimeters, or millimeters). – Show formula bar. – Show screen tips. – Disable hardware graphics acceleration (to disable animations and reduce memory consumption). – Show comments and/or indicators. – Default direction for new sheets (left to right, or right to left). – Show scroll bars (horizontal and/or vertical). – Show sheet tabs. – Show objects (illustrations, charts, text boxes, and WordArt objects). – Show row and column headers. – Show formulas instead of results. – Show sheet right-to-left. – Show page breaks. – Show outline symbols if applied. – Show gridlines. – Set gridline color. – Enable multi-threaded calculation and set the number of used processors. – Scale content for A4 or 8.5×11″. – Set some web options. – Edit custom lists. – Ensure some Lotus compatibility aspects. |
| Customize Ribbon | The “Customize Ribbon” category provides settings for customizing Excel ribbon: * For commands: – Add commands to created groups. – Remove these added commands. * For tabs: – Create a new tab to add to the ribbon. – Remove a tab created by the user. – Rename a tab. – Move a tab. * For groups of commands: – Create a new group of commands to add to the ribbon. – Remove a group of commands. – Rename a group of commands. – Move a group of commands. * For the ribbon: – Reset customizations to default settings. – Import ribbon customization that belong to another computer. – Export ribbon customization to apply on another computer. |
| Quick Access Toolbar | The “Quick Access Toolbar” category provides settings for customizing the Quick Access Toolbar: – Apply the Quick Access Toolbar customizations for all workbooks or for just the current one. – Show Quick Access Toolbar below the ribbon (By default, it is above the ribbon). – Add a command. – Move a command. – Remove a command. – Modify label or icon of a button assigned to a macro. – Reset customizations to default settings. – Import Quick Access Toolbar customization that belong to another computer. – Export Quick Access Toolbar customization to apply on another computer. |
| Add-ins | The “Add-ins” category provides settings related to Excel add-ins: – Activate an add-in. – Deactivate an add-in. |
| Trust Center | The “Trust Center” category provides settings related to security and privacy: * Trusted Locations: – Add a trusted location. – Change a trusted location. – Remove a trusted location. – Allow trusted locations on my network. – Disable all trusted locations. * Add-ins: – Don’t allow add-ins from the web to start. – Don’t allow add-ins from the Office store to start. * ActiveX: – Disable ActiveX controls. – Prompt before enabling ActiveX controls. – Enable all ActiveX controls. * Macros: – Disable all macros. – Disable unsigned macros. – Enable all macros. * Protected View: – Enable protected view. * Message Bar: – Show a message bar about blocked content. * External Content: – Enable data connections without prompt, with prompt, or disable them. – Enable automatic update for all workbook links without prompt, with prompt, or disable them. – Enable linked data types without prompt, with prompt, or disable them. – Enable Dynamic Data Exchange server lookup or launch. – Block connection of untrusted Query files. * File Block: – Block file types from opening. – Block file types from saving. – Completely block file types or open them in protected view with or without editing ability. * Privacy: – Send additional diagnostic and usage data to Microsoft. – Let Office analyse your content to provide you with improvements (design recommandations, editing suggestions…). – Let Office download online content (templates, images, models, help materials…). – Enable viewing of diagnostic data collected by Microsoft. – Remove personal information from file properties. – Set language pairs for translation. – Add a dictionary for searching. – Update or remove a dictionary for searching. |
C/ How to enable Excel options window if missing
Sometimes, and due to a corrupt version of Excel, a bug, or conflicting add-ins, the Excel Options window doesn’t display after clicking the File tab and Options (or Excel Options for 2007 version), and Excel just get the user back to the initial view without doing anything and without throwing any error message. All the features work normally, but the user is unable to change Excel settings and options.
To fix this issue and enable back the display of Excel options dialog box:
- Launch Excel without opening or creating any file, then retest.
- Update your Excel version.
- Open Excel in safe mode and retest:
- If Excel Option window opens in safe mode, then an add-in is the problem.
- Disable add-ins one by one and retest.
- Repair Office.
- Scan for corrupted files and repair them.
If you need more insights about each of these solutions, I’ll detail how to implement them in the following:
1. Launch Excel without opening or creating any file
This first solution is just a workaround, but it’s very fast and easy to implement. You’ll try to launch Excel Options dialog box outside any workbook.
So, without opening any workbook, click on Excel icon from your taskbar or list of programs. When Excel startup window displays, don’t create any new workbook; instead, go directky to the Options command and click on it.
If you’re lucky enough, Excel Options dialog box will show up and you can set whatever you want in it.
If it doesn’t show, go to the next step.
2. Update your Excel version
If you aren’t allowing automatic Office updates, you’ll need to update Excel manually:
– In Office 2010: click on the “File” tab, then on “Help”; and finally click on “Check for updates”.
– In Office 2013 and newer: click on the “File” tab, then on “Account”. Drop-down the “Update Options” command and choose “Enable Updates”, then “Update Now”.
If the update of Excel doesn’t fix the options window display issue, go to the next step.
3. Open Excel in safe mode and retest
Opening Excel in safe mode will disable any add-ins and allow you to check if the options display issue is related to add-ins that you may then need to disable to resolve it.
To open Excel in safe mode:
- Use keyboard shortcut Windows + R.
- The Run dialog box displays.
- Type in: excel /safe
- Excel opens in safe mode.
You’ll need now to retry opening the Options window. If it successfully displays, then the problem was certainly due to an add-in. You’ll need now to find the add-in source of the issue by disabling add-ins one by one in the safe mode, and then restarting Excel in a normal mode and retesting the opening of the Options dialog box.
To disable an add-in, click on the “Add-ins” category from the left pane of Excel Options dialog box. Then, next to “Manage”, select the category you want and click on “Go”. You’ll need now to uncheck the add-in you want to deactivate and click “OK”.
Restart now Excel (in normal mode) and try opening the Options window. If it still refuses to display, then repeat the process: Safe mode –> Deactivate another add-in –> Restart Excel in normal mode –> Retry opening the Options window. And so on.
4. Repair Office
If the previous solutions didn’t work for you, try to repair Office.
To repair Office in Windows 7, 8, or 8.1:
- Click on “Windows Start” button.
- Click on “Control Panel” command.
- Under “Programs”, click on “Uninstall a program”.
- Select the Office suite or program.
- Click on “Change”, then “Repair”.
To repair Office in Windows 10:
- Right-click the “Windows Start” button.
- Click on “Apps and Features” command.
- Select the Office suite or program.
- Click on “Modify”, then “Repair”.
To repair Office in Windows 11:
- Right-click the “Windows Start” button.
- Click on “Installed apps” command.
- Select the Office suite or program.
- Click on the three dots menu next to it.
- Click on “Modify”, then “Repair”.
If the Office repair doesn’t solve the problem, go to next step.
5. Scan for corrupted files and repair them
If all these solutions didn’t solve the issue of not displaying the Excel Options window, then you’ll need to perform a scan for corrupted files and repair them. For this, you’ll use the System File Checker tool of Windows:
* In Windows 7:
- Click on the Windows button, then on the Search box.
- Type in: cmd
- Right-click on the cmd (Command Prompt) and choose “Run as administrator”.
- In the cmd window, type in: sfc /scannow
- Press “Enter”.
* In Windows 8, 8.1, 10, and 11:
- Right-click on the Windows button, then choose the “Command Prompt (Admin)”.
- In the cmd window, type in: sfc /scannow
- Press “Enter”.
The System File Checker tool will search for corrupted files and repair them. After running the sfc command, try again to open the Excel Options window.
D/ Wrap up
Excel Options window provides all the settings to customize Excel display and behavior.
In some rare cases, the Excel Options window doesn’t show because of bugs, files corruption, or add-ins conflict; you’ll need then to follow the instructions of the solutions detailed above to fix this issue.

Jeff Golden is an experienced IT specialist and web publisher that has worked in the IT industry since 2010, with a focus on Office applications.
On this website, Jeff shares his insights and expertise on the different Office applications, especially Word and Excel.